3.2.2 Workflow
This section describes the following items:
- Workflow list
- Workflow operation window
- Workflow operation window (when using Stepper)
- Workflow [Execution Log] window
The “Workflow” tab summarizes the information required for carrying out workflows and confirming workflow statuses.
Workflows are created when launching the service catalog or upon manually or automatically executing schedules. In addition, workflows can be executed directly with the API and can be used in user-specific applications, etc. For details on the API, see “Detailed API reference information > Standard API functions” in “JP1 Cloud Service/Operations Integration API Reference”.
Workflow consist of multiple steps prepared in advance. You will navigate to the next window upon completing each step. To navigate to the next step, click on the “Action” button located at a set position in the window.
The Workflow tab consists of operation buttons and a workflow list.
(Table) Workflow tab window components
| Components | Description |
|---|---|
| Operation button | This button is used to carry out operations for workflows which have been checked in the workflow list.
|
| Workflow list | A list of workflows is displayed. For details on displayed items, see "(Table) Workflow list items". |
You can delete a workflow by clicking the [Delete Workflow] button. This button is displayed for users who are assigned the Primitive role "context_admin" in the task application.
The [Delete Workflow] button is enabled when one or more checkboxes in the workflow list are selected. In the [Delete Workflow] dialog box displayed when you click the button, select the [Confirmed] checkbox and click the [OK] button. The [Information] dialog box is displayed. The [Information] dialog box displays the deletion status of the selected workflows. The following messages are displayed depending on the deletion status. The "X" in the messages represents the number of deleted workflows.
- If all workflows are deleted:Deleted X workflows.
- If some workflows are not deleted:
Deleted X workflows. Following workflows are not deleted.List of context IDs of workflows that were not deleted- If no workflows are deleted:
Workflows are not deleted.
 Notes
- Deleted workflows cannot be restored.
- Deleting workflows does not delete the tickets linked to them.
- Deleting workflows does not delete custom tables created by the workflows.
- Deleting workflows does not interrupt executed automation job templates, JP1/AJS3 linkage templates, or JP1/IM linkage templates. It also does not delete job execution logs.
- Deleting workflows does not prevent notifications from executed oi.notify or emails sent via core.sendmail from being delivered.
- Deleting workflows executed from the [Work item management function] window does not delete the work items. It also does not delete linked results, and "Closed" is displayed as the status in the [Actual Results] tab. In this case, you can re-execute workflows by clicking the [Execute Workflow] button. For details about the workflows started from a schedule, see "Associating schedules with workflows".
- Deleting a main flow also deletes its subflows. In addition, subflows cannot be deleted independently.
- If a deleted workflow was specified as a related record of a ticket, the corresponding entry is removed.
- If you perform operations in the workflow operation screen that was displayed before deletion, or click a URL for the deleted workflow, an error occurs.
(1) Workflow list
Details on the workflow list are shown below.
Item Description 
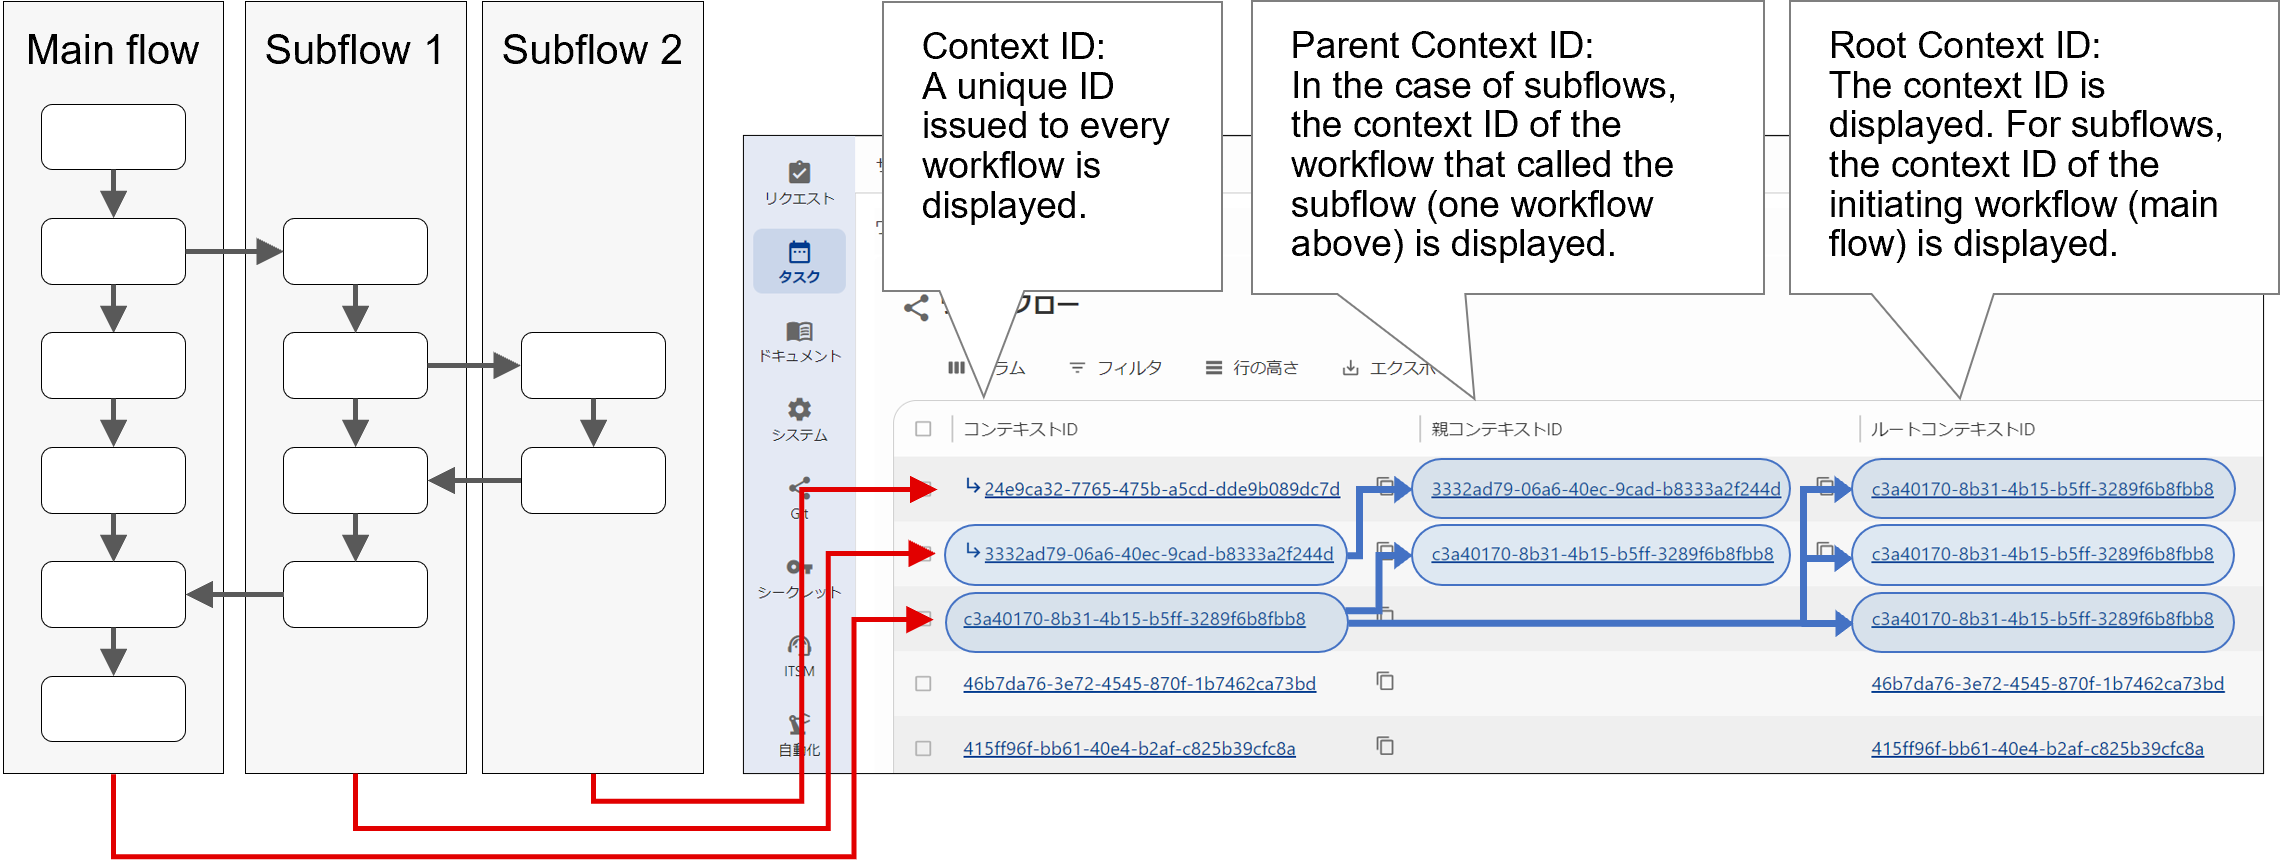
A checkbox for selecting target operations. Ticket Number Displays the ticket numbers for request tickets which were created automatically upon execution of a workflow. Click to navigate to the "Ticket details" window. Context ID A context refers to an executed workflow. The ID used to identify that workflow is displayed. Click the link to display the window from which you can perform workflow operations. Windows for operating workflows must be created in advance depending on the task at hand. Subflows*1 are marked with the  icon. When a workflow that includes a subflow is processed more than once, a new context ID is issued for each iteration.
Parent Context ID In the case of subflows*1, the context ID of the workflow that called the subflow (one workflow above) is displayed. In the case of main workflows, the field is left blank. Root Context ID The context ID is displayed. In the case of subflows*1, the context ID of the root workflow (the topmost workflow) is displayed. Workflow ID The ID for identifying workflow definitions is displayed. Workflow The display name of the workflow definition is displayed. Title The name of the workflow is displayed. The names of each workflow can be edited; however, the input fields may not be left blank. Assigned To The users assigned to the current activity are displayed. Assigned Group The group assigned to the current activity is displayed. Customer*2 The name of the customer user who made the request from the service catalog is displayed. Requester The first and last name of the user who made the request from the service catalog is displayed. Opened The date and time on which the workflow was created are displayed din Japan Standard Time (JST). Status*3 The status of the workflow is displayed. For more information on the items and icons displayed alongside statuses and their respective meanings, see "(Table) Status icons and their meanings". Step*3 The status of the activity for each step is displayed. For more information on the meanings of icons displayed alongside steps, please see "(Table) Step icons and their meanings". (Columns added by the user) These columns are displayed if they have been added in advance. If columns added in the "Workflow list" window are also added in the "Workflow details" window, you can edit their values in the "Workflow details" window by clicking the "Context ID" link.
You can set the display name of the columns, such as "Description" and "Category".
For details about how to add columns, see "Customizing the workflow window".*1: For details on subflows, see "Designing a workflow".*2: If the creator of the workflow is a customer user, the customer to which the creator belongs is set as the customer for the workflow. Changing the customer to which the creator belongs after creation does not change the customer for the workflow.*3: Immediately after executing a workflow from the service catalog, the status will temporarily be set to "Pending" and the steps may not be displayed. Also, the status may not change from "Requested" or "Running" to the next status. If the status does not change to the next status after at least 10 minutes, cancel the workflow and create a new one.A figure showing the relationships between the various context IDs is presented below.
(Figure) Relationships between context IDs
(Table) Status icons and their meanings
Icon Status Description Workflow list [Execution Log] window 

Succeeded A status indicating that the workflow has successfully been completed. 

Failed A status indicating that the workflow was not completed successfully. 

Abandoned A status indicating that the workflow was abandoned due to abnormal termination. 

Canceling A status indicating that the workflow is changing to the "Canceled" status. 

Canceled The workflow was canceled. 

Requested A status indicating that workflow execution has been initiated. 

Scheduled A status indicating that the execution of the workflow has been scheduled and it is in standby. The workflow will be automatically executed in line with the scheduled instructions.* 

Pausing A status indicating that the workflow is entering the "Pending" status. 

Paused A status indicating that the execution of the next step is pending input from the user. 

Resuming A status indicating that the workflow is transitioning from the "Pending" status and will resume. 

Pending A status indicating that the workflow is pending execution of the next step. 

Running A status indicating that one of the steps of the workflow is currently being executed. 

Retrying A status indicating that one of the steps of the workflow is currently being retried. 

Delayed A status indicating that execution of the workflow is delayed. 

Timeout A status indicating that one of the steps of the workflow has timed out. 

Null A status indicating that an unexpected error has occurred. *Support for this status is scheduled for the future.(Table) Step icons and their meanings
Icon Description A status indicating that the step was successfully processed. A status indicating that the step did not process successfully (failed). A status indicating that the workflow is pending execution of the next step. A status indicating that the processing for the step has not yet begun. 
A status indicating that the step was rejected by the user. A status indicating that the step is currently being executed. A status indicating that the workflow is changing to the "Canceled" status. A status indicating that the step has been canceled. A status indicating that the step was abandoned due to abnormal termination. A status indicating that the step timed out. A status indicating that execution of the step has begun. A status indicating that the execution of the step is delayed. A status indicating that the workflow is entering the "Pending" status. A status indicating that the execution of the next step is pending input from the user. A status indicating that the workflow is transitioning from the "Pending" status and will resume. A status indicating that one of the steps of the workflow is currently being retried.
More information regarding user operations and the stages leading up to the execution of a workflow is shown below. For more information on the service catalog, see “Service catalog”. For more information on the “save” and “start” action buttons, see “(Table) Action button type (UI version 1.0)” or “(Table) Action button type (UI version 1.1)”. For more information on the work item management function, see “Work item management functions”.
Also, the “save button processing” and “start button processing” in the figure below include Ops I’s standard processing for when the action button is clicked. For details, see “(Figure) Processing that can be added to standard action buttons”.
(Figure) Relationship between user operations and workflow execution stages
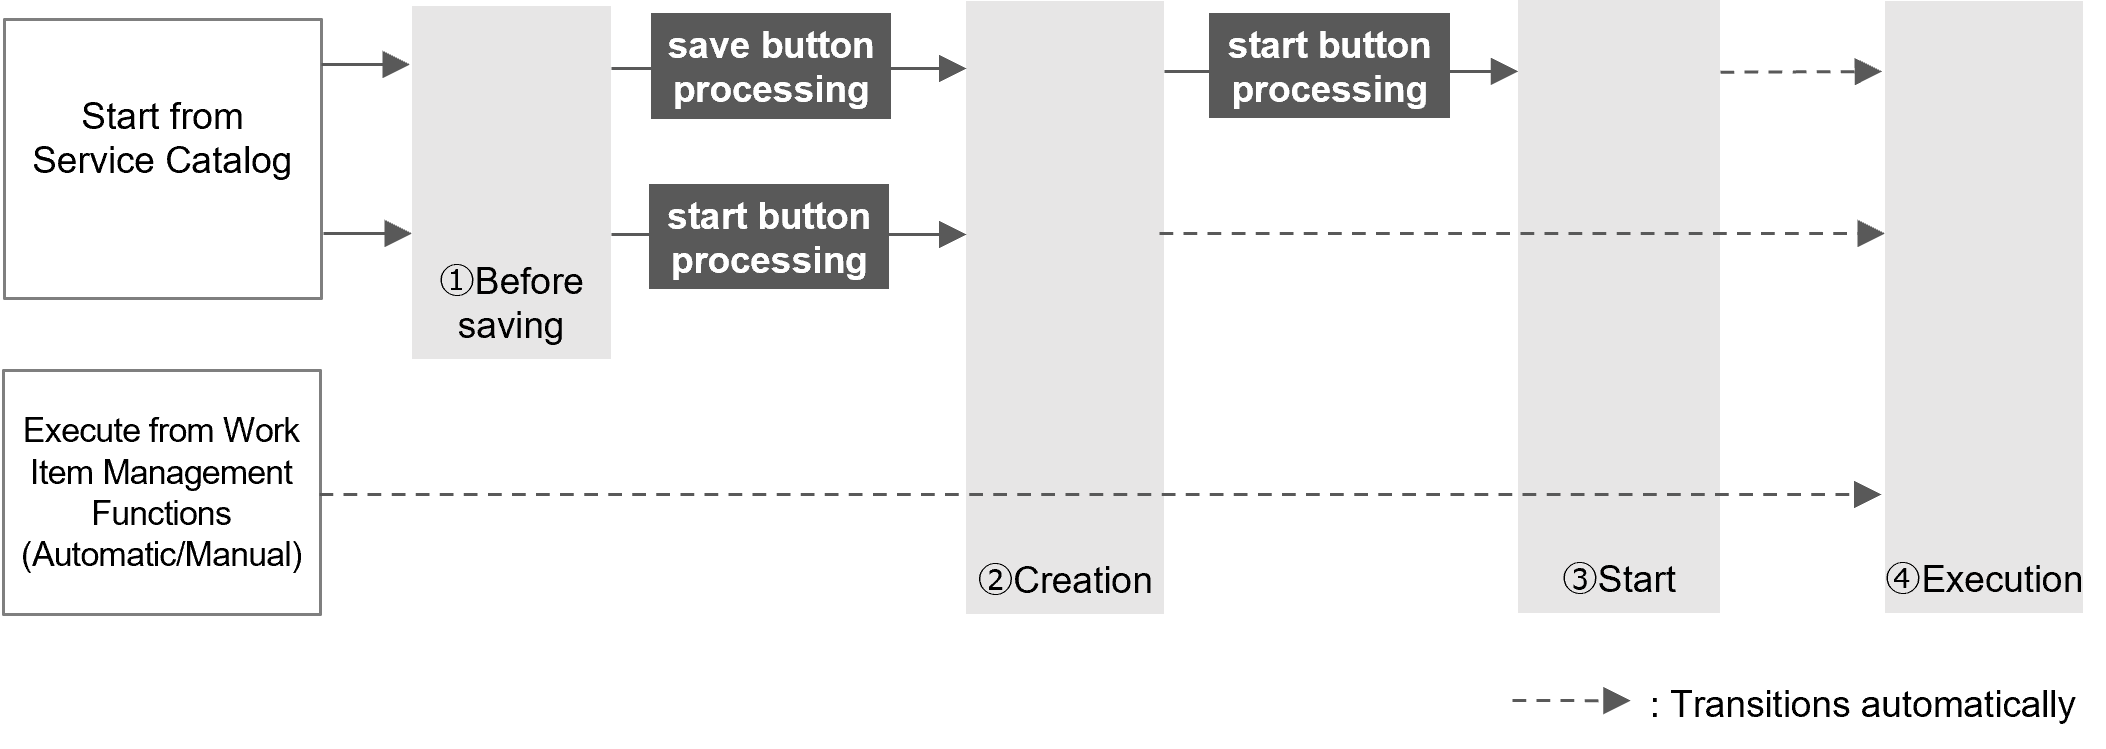 ① Before saving:
The window for the first step of the workflow is displayed. Workflow-related information is not saved in Ops I.② Create:
Workflow information is saved in Ops I and a context ID is issued. Awaiting commencement of workflow. The status of the workflow at this stage is "Pending".③ Start:
Requires that the workflow be executed. The status of the workflow at this stage is "Requested". Transitions automatically to ④ .④ Execute:
The workflow has been executed. The status of the workflow is "Running". The status will then subsequently change depending on the tasks defined in the workflow, user operations, etc. Actions buttons other than "save" and "start" are used from this stage onward.
You can open the workflow operation window directly by directly entering the following URL.
- To open the window for creating a new workflow
URL of Ops I/sys_task/task_catalog?workflowId=workflow ID
- To open the workflow list
URL of Ops I/sys_task/workflow/workflow_list
-
To open the window for operating workflows that have already been created
URL of Ops I/sys_task/workflow/workflow_list/workflow_detail/context ID
-
To open the workflow [Execution Log] window
URL of Ops I/sys_task/workflow/workflow_list/workflow_log/context ID
- To display on the request application
Replace "sys_task" in the URL with "sys_request".
(2) Workflow operation window
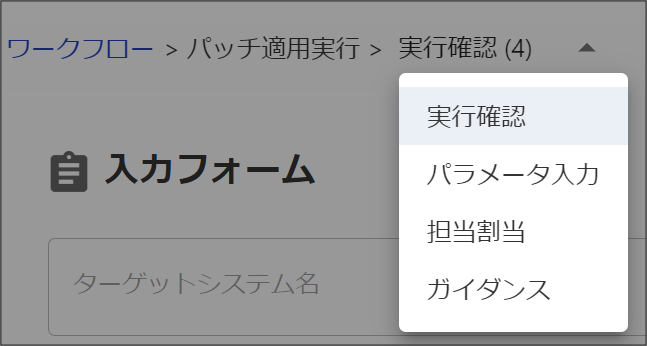
Click on the links of workflow context IDs displayed in the workflow list to display the “Workflow operation” window created in advance. You can also use the breadcrumb trail displayed at the top of the window to switch the displayed window for each step. The content displayed in the activity does not show the values specified during past activity operations, but instead shows the current data model values. When displaying steps that have already been processed, the information in the “Workflow operation” window is shown as inactive.
(Figure) Workflow operation window example
(3) Workflow operation window (when using Stepper)
For workflows using Stepper, the appropriate operating personnel can be assigned for each step in accordance with the schedule and skills required for the work task. Add the definitions to the YAML file for the UI to enable the use of Stepper. For details, see “Designing a workflow” and “UI”.
Do not place the Stepper component in the first step of the workflow. This can be used when the workflow execution stage is “Creation” or later. For details on the workflow execution stages, see “(Figure) Relationship between user operations and workflow execution stages”.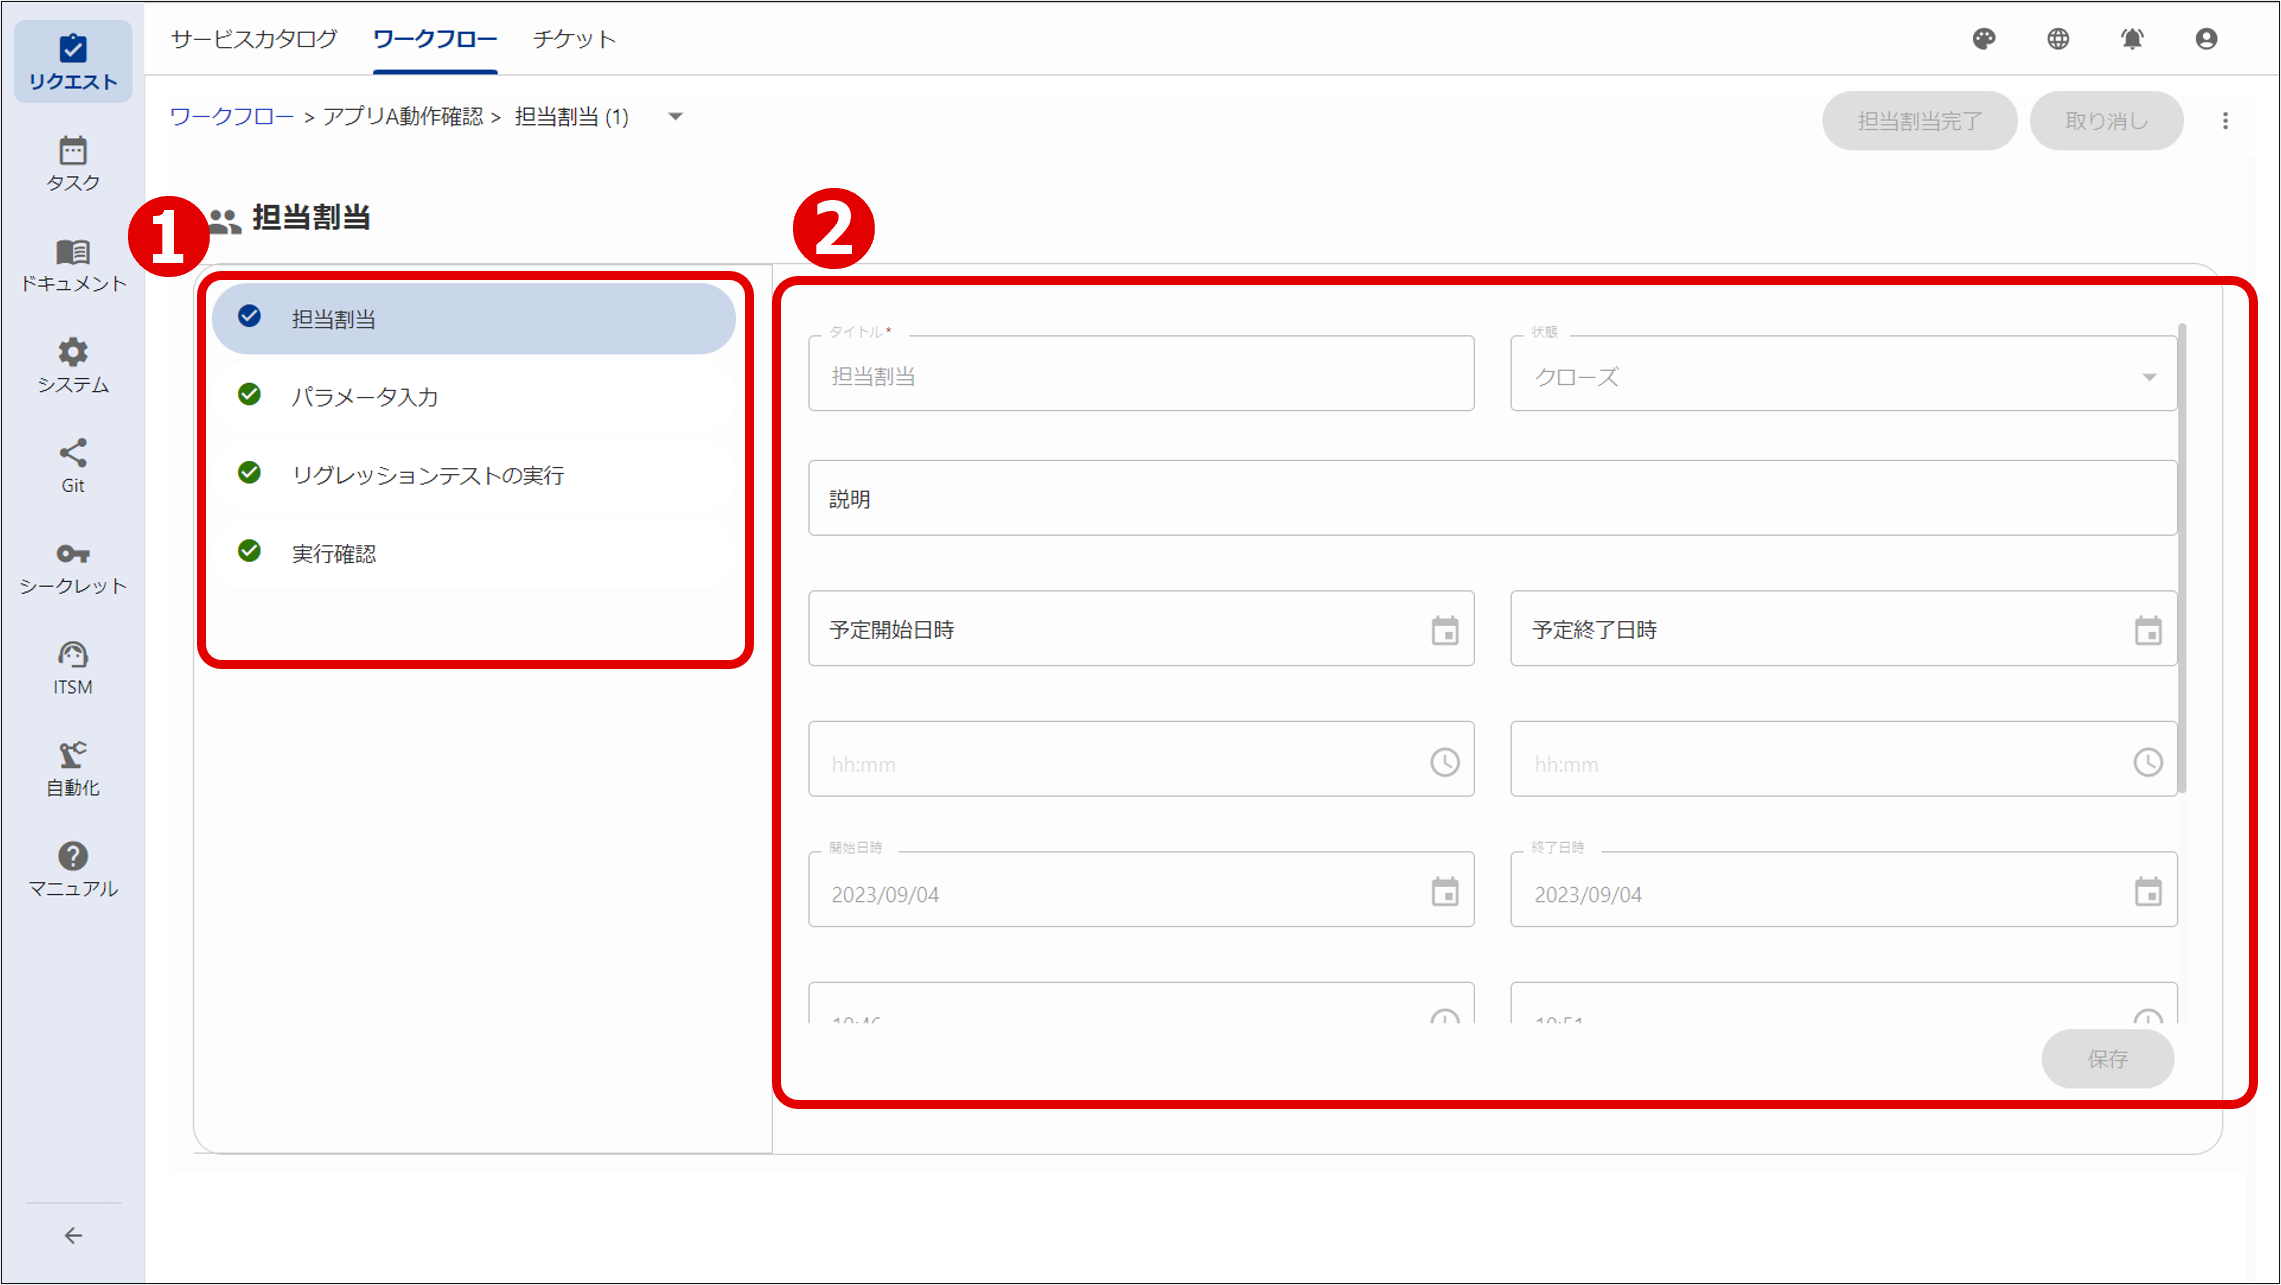
The “Stepper” window consists of a “Workflow steps list” (①) and “Schedule input area” (②) for each step.
(Table) Stepper window components
Components Description ① Workflow steps list A list of steps for the workflow. Click the respective steps to display a schedule for the steps selected in the schedule input area. ② Schedule input area Used to set descriptions of the work tasks for each step, the planned start date, assigned agent, etc.
(Table) Input items for the schedule input area
Components Required Description Title Yes The names defined for each step in the Workflow YAML file are displayed. These can be changed. Status No The four statuses shown below are displayed in the drop-down menu. Select the appropriate status. - Not started yet
- In progress
- Pending
- Closed
Description No Enter a description of the work task. Planned Start No The planned start date
Specify the planned start time in the "hh:mm (a|p)m" field under "Planned Start".Planned End No The planned end date
Specify the planned end time in the "hh:mm (a|p)m" field under "Planned End".Start Automatic display The date that the workflow step actually started and ended
This item is filled in automatically when a step is executed and is shown just for reference by the user.
If a workflow is executed more than once and the same step is executed multiple times, the start date will show the date of the first execution, and the end date will show the date of the last completed execution. Using the example shown below where the same step is executed twice, the start date shows as 2/6 10:00 am and the end date shows as 2/7 03:00 pm.
1st execution: Start date: 2/6 10:00 am to End date: 2/6 12:00 pm
2nd execution: Start date: 2/7 01:00 pm to End date: 2/7 03:00 pmEnd Automatic display Assigned Group No Click the  icon to select the assigned group.
Assigned To No Click the icon to select the assigned agent.Operation Time No Enter the time required for the work task. For steps with a completed status, “Planned Start”, “Planned End”, “Assigned Group” and “Assigned To” items cannot be edited. Completed status as used here refers to any of the following: “Succeeded”, “Failed”, “Abandoned”, “Canceled” or “Timeout”. However, steps that have a completed status resulting from a rejection of the step can be edited.
Assign groups in the “Assigned Group” window. Click the
icon for the assigned group in the “Stepper” window to navigate to the “Assigned Group” window.
Select a group that you want to assign to a work task from the list of groups displayed in the “Assigned Group” window and click the “Assign” button to assign that group accordingly. If “Assigned To” is selected first in the “Stepper” window, only the group to which the selected agent belongs will be displayed.
The “Candidate” window that is displayed when the
icon for an agent in the “Stepper” window is clicked is shown below.
The “Candidate” window displays users, groups to which the users belong, and user schedules. This window also displays information such as the skillset sufficiency rate of a candidate with respect to the skills held by the candidate to the skillset defined for each step. This allows you to select the most appropriate agent for a given work task. For details on skillsets and skills, see “Resources”.
Click a user that you want to assign to a work task from the displayed list of users and then click the “Assign” button to assign that agent accordingly.
To display users in the “Candidate” window, you must first configure the management relationships between groups. (For more information on this topic, see “Configuring management relationships between groups”.) Upon doing this, the users of the groups for which a management relationship has been configured will be displayed in the “Candidate” window.
If “Assigned Group” has been selected first, users who belong to the selected assigned group and those who belong to groups for which a management relationship has been configured will be displayed.(Figure) Candidate window (when navigated to from a workflow)
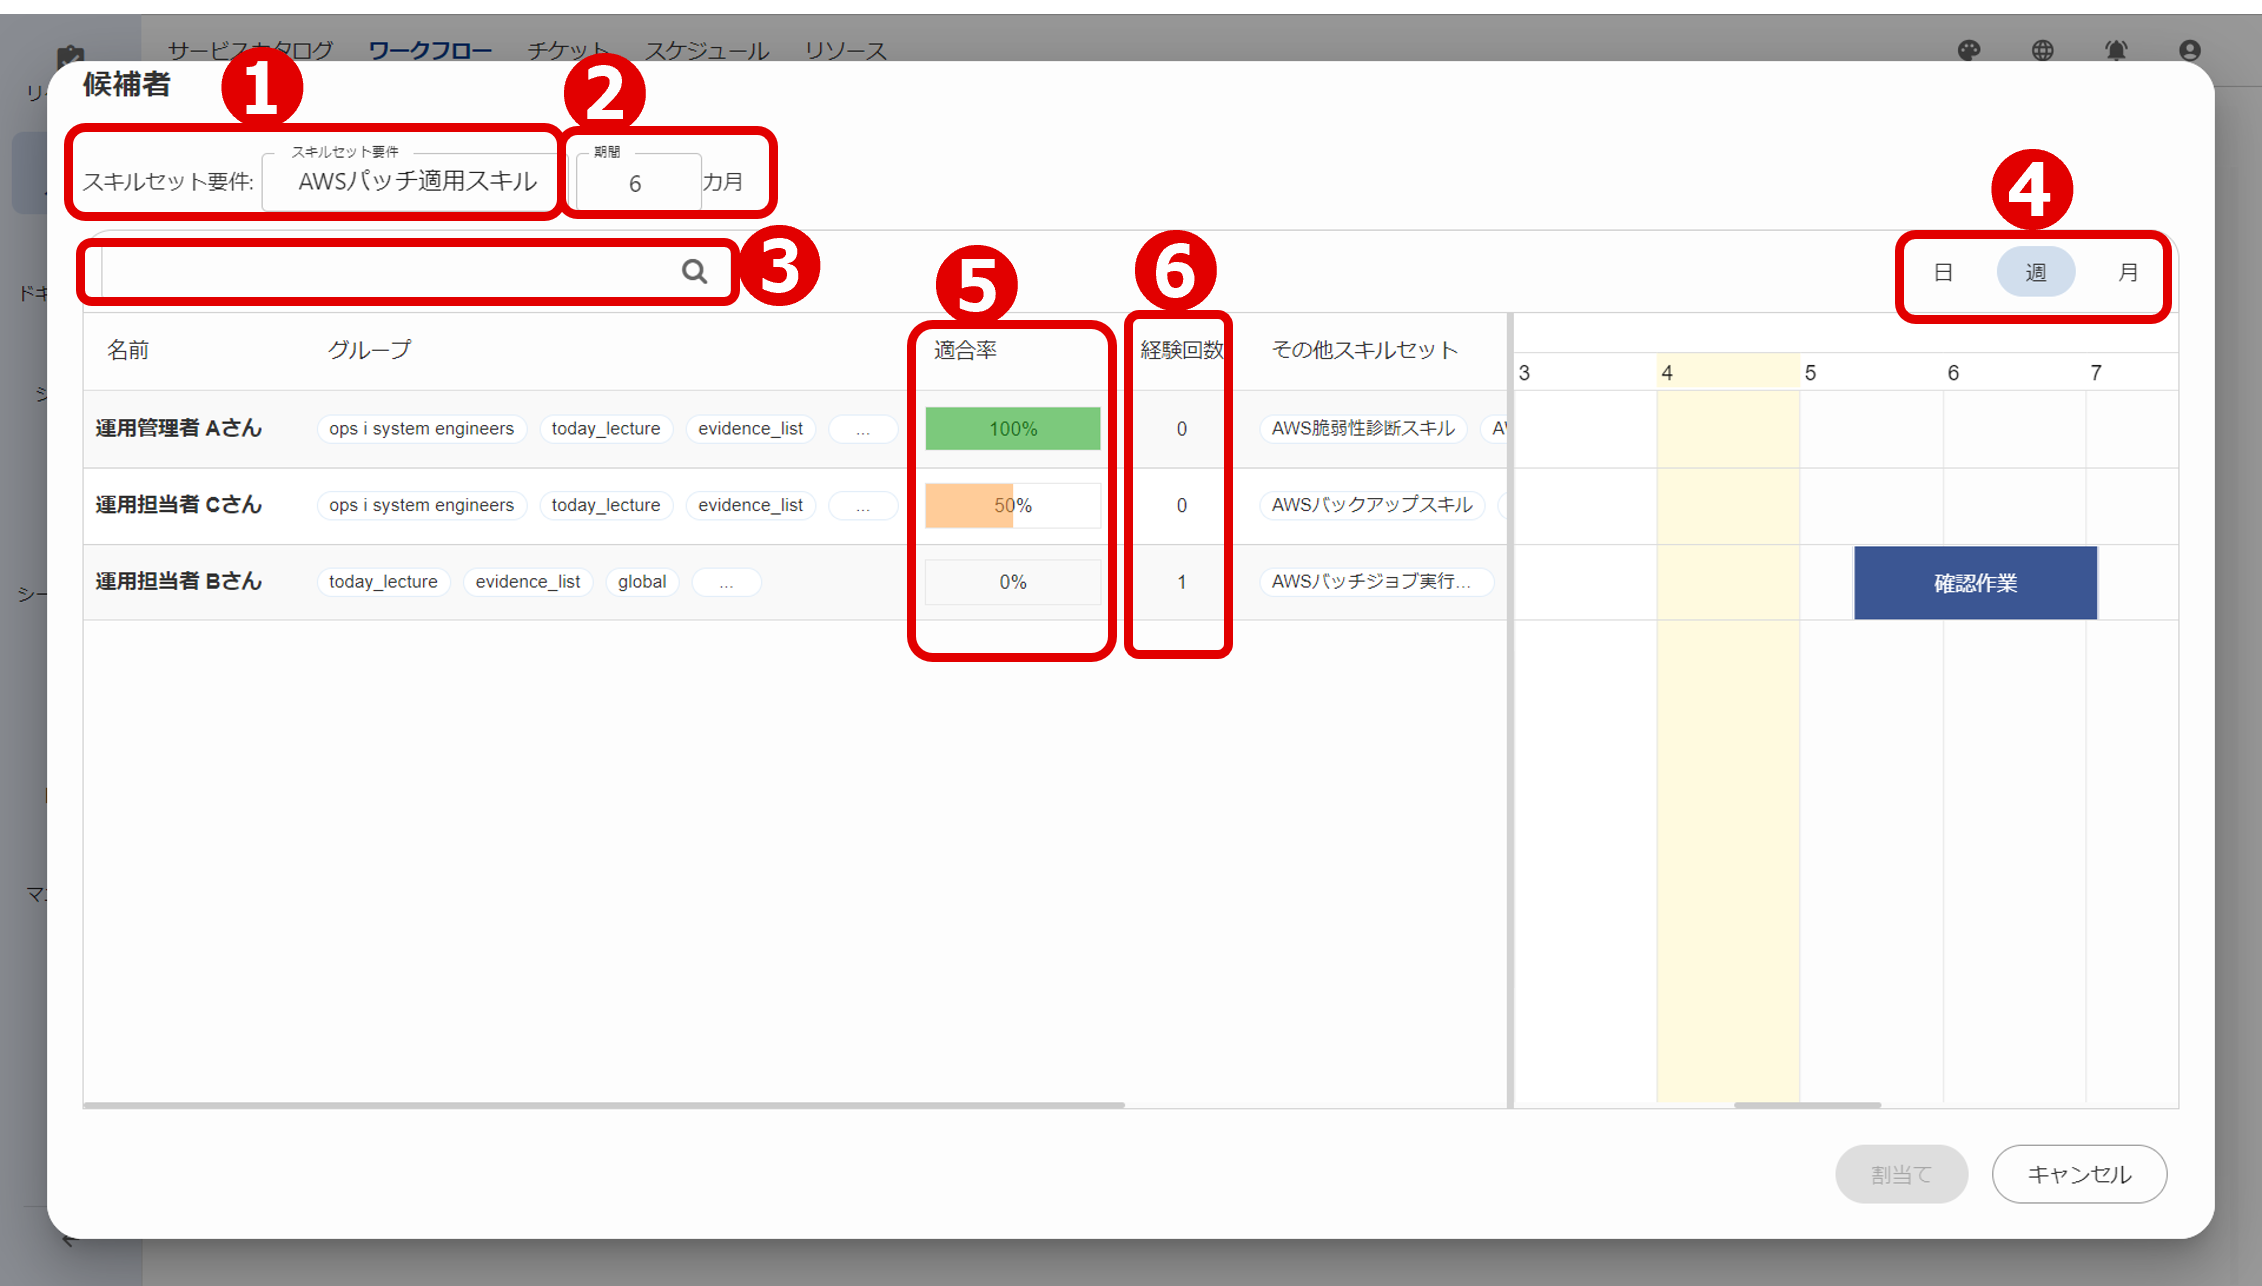
(Table) Candidate window components
Components Description ① Skillset Requirement In the YAML file for the Workflow, the label names of the skillsets defined for the selected steps will be displayed. If no skillsets have been defined, "Not specified" will be displayed. ② Duration Enter the period. The number of experiences counted during the entered period will be displayed in the "Experiences" field shown in ⑥. ③ Search window Enter keywords such as user names or the names of skills and click the icon to perform a filtered search of users.④ Switch display button Use this button to switch the schedule list between displaying by day, week or month. ⑤ Skillset Sufficiency If a user has all the required skills in a skillset, this will display as 100%. If "Not specified" has been set for "Skillset Requirement", the field will be left blank. ⑥ Experiences The number of experiences in a workflow counted during the period entered in ② will be displayed.
[Configuring management relationships between groups]
To display users in the “Candidate” window under “Assigned To”, you must first configure the management relationships between groups in the “Add Schedule” window. Doing this allows you to view groups and users for which a management relationship has been configured. The method for configuring management relationships between groups is shown below.
1. Assign users to groups in the "System Configuration" window to form groups of users.2. Select the groups that you want to configure the management relationship for in the "System Configuration" window and then, in the "Related Groups" window under "Related Groups", select "Manage" or "Managed" for the "Relation Type" for the relevant groups. The management relationship can also be set to "Manage/Managed". For example, by setting the relationship of a group that has been set to "Manage" to "Managed" in the "Related Groups" window, the management relationship can be set to "Manage/Managed".For details on forming user groups as per step 1, see “Adding users”. For details on managing group relationships as per step 2, see “User management” and “Adding groups”.
The schedules for assigned personnel can be viewed in the “Schedule” tab. For details, see “Schedule”.
(4) Workflow [Execution Log] window
Clicking the [Open Execution Log] button displayed in the "Workflow" tab in the task application displays the [Execution Log] window for the selected workflow in a new tab. The [Open Execution Log] button is enabled when one checkbox in the workflow list is selected. The [Execution Log] window shows the execution status of the workflow and detailed logs. Therefore, when a newly created workflow fails, you can identify the cause and correct it.
The [Execution Log] window is available to users who are assigned the Primitive role "action_execution_viewer".The [Execution Log] window consists of a task list displayed on the left side of the screen and execution log details displayed on the right side of the screen. Immediately after navigating to the [Execution Log] window, the workflow execution log is selected. In addition, the breadcrumb list displays the value set for the “label” property in the Workflow YAML file.
The task list displays the workflow execution log and all executed tasks of the workflow. For details about the items displayed in the task list, see “(Table) Components of the task list”.
The execution log details display the execution log details, Action Output, and Action Input for the item clicked in the task list. For details, see “(Table) Components of the execution log details”.The following tables show the details of the content displayed in the task list and the execution log details.
(Table) Components of the task list
Components Description Status icons Status icons are displayed. When you hover the cursor over an icon, the status name is displayed. For details about the displayed statuses, see "(Table) Status icons and their meanings".  icon
This icon is displayed when the task is a subflow. Start time* The start time is displayed in "HH:MM:SS" format. Workflow Label* For the workflow execution log, the workflow name is displayed. Task Label* For executed tasks, the task name is displayed. Action Name* For executed tasks, the action name is displayed.  icon
This icon is displayed when the task is a subflow. Clicking this icon displays the main flow [Execution Log] window in a new tab.  icon
This icon is displayed when the executed task contains a subflow. Clicking this icon displays the subflow [Execution Log] window in a new tab. *If the displayed string is too long, the portion that cannot be displayed is abbreviated as "...". You can view the abbreviated portion by hovering the cursor over it.
(Table) Components of the execution log details
Components Description Execution log details Properties are displayed in "property name:value" format. The following items are displayed: Property name Value Status The status name and the status icon are displayed. For details about the displayed statuses, see "(Table) Status icons and their meanings". Workflow Label For the workflow execution log, the workflow label is displayed. Workflow Name For the workflow execution log, the workflow name is displayed. Task Label For executed tasks, the task label is displayed. Task Name For executed tasks, the task name is displayed. Step Label For executed tasks with steps, the step label is displayed. Step Name For executed tasks with steps, the step name is displayed. Step Description For executed tasks with steps, the step description is displayed. Action Name For executed tasks, the action name is displayed. Started On The start date and time are displayed in "YYYY-MM-DD HH:MM:SSZ" format. Finished On The finished date and time are displayed in "YYYY-MM-DD HH:MM:SSZ" format. Action Output The execution log is displayed. Depending on the execution results, this component consists of up to three text areas: "output", "error", and "traceback". The details of each are as follows: - output
Output information is displayed. If no output is generated, "None" is displayed. - error
An error message is displayed when execution fails. - traceback
The function execution log is displayed when execution fails. However, it might not be displayed depending on the task or the nature of the failure.
 icon, or select all text in the text area by pressing the "Ctrl"+"A" keys, and then copy it.
In addition, you can collapse the display by clicking the icon.
For details on how to handle errors when they are displayed, see "How to deal with workflow errors".
Action Input The information entered at the time of execution is displayed in "property name: value" format. If no information is entered, "No Input" is displayed.
If the displayed string is too long, the portion that cannot be displayed is abbreviated as "...". To view the abbreviated text, hover the cursor over the string or copy it. To copy the string, click the icon, or select and copy the string including "..." in "Action Input".
In addition, you can collapse the display by clicking the icon.
Notes
If, after the user displays the [Execution Log] window, another user updates content in the task list or the execution log, the updated content is not reflected in the display unless the user manually refreshes the [Execution Log] window. To update the display, close and then open the [Execution Log] window again.
- If some workflows are not deleted: